Legendary Tales 3 Chapter 2 Walkthrough – Little Red Riding Hood
Legendary Tales: Stories · last updated 2026-10-15
Chapter overview and locations
A young girl sets off through a winter forest to bring gifts and supplies to her sick grandmother. Along the way she repairs a village hearth, crosses a frozen lake and a sawmill area, and gathers mushrooms and plants. She brews an enchanted potion and delivers it at her grandmother's house.
Scenes in this chapter: Snowy village lane with a bridge and the hut's hearth room · Snowy forest path with stone steps and a carved sun-and-moon board · Frozen lake with a log hut and boats · Frozen lake shore with a sawmill and a partly built boat · Grandmother's log house interior with bed and stove · Stained-glass rosette window wall
Step-by-step walkthrough
Follow the scenes below. Required items and screenshots sit beside each stop; answers expand on request. Select a screenshot to enlarge it.
Jump to a scene · 4 sections
Scene 01
Leave the house and follow the rune route
Begin with the chip connection and key lock, then the basket and short sequence. Continue through the rune lock and sign mechanism.
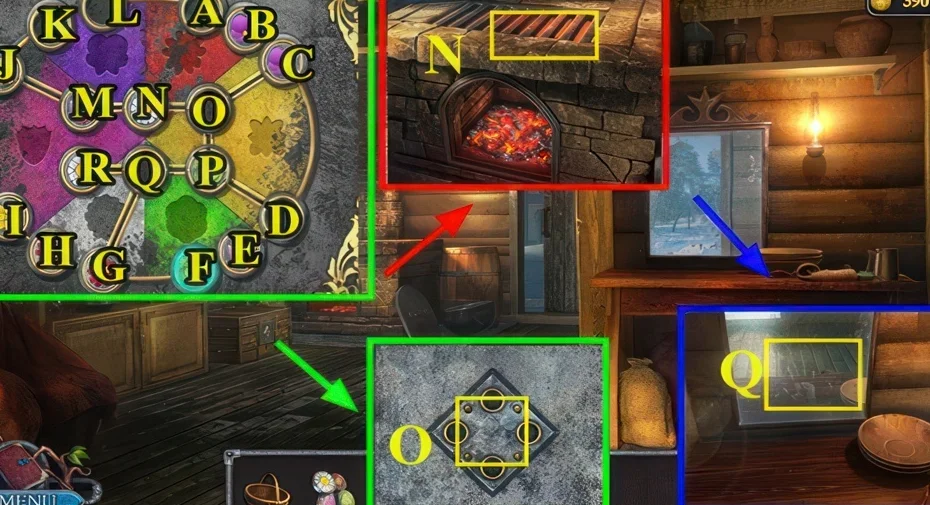
1Chip connection puzzle
Where: Chapter 2, marker O, after warming water in the ladle
You need: Chips 4/4
Connect the chips at the opening board.
Show the full solution
B-K, C-L, P-D, G-A, H-B, I-C, D-O, E-I, R-H, O-E, N-G, M-R, J-D, R-J.
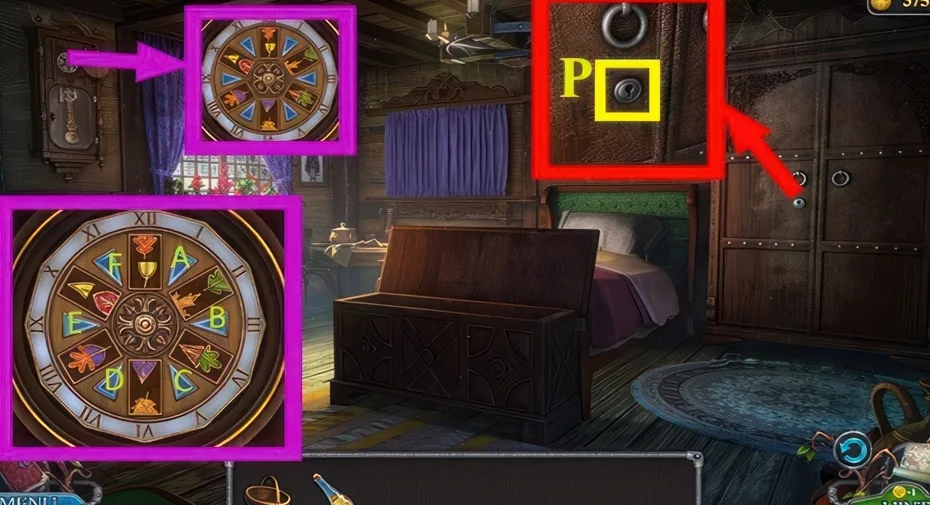
2Key lock puzzle
Where: Chapter 2, marker P, in the first hut
You need: Key
Use the key on the first locked mechanism.
Show the full solution
E, F, B, C, C, C, B, E, D, D, D, E, D, E, D, D, D, E.
3Basket puzzle
Where: Chapter 2, marker U
You need: Basket
Inspect the basket and complete its mechanism.
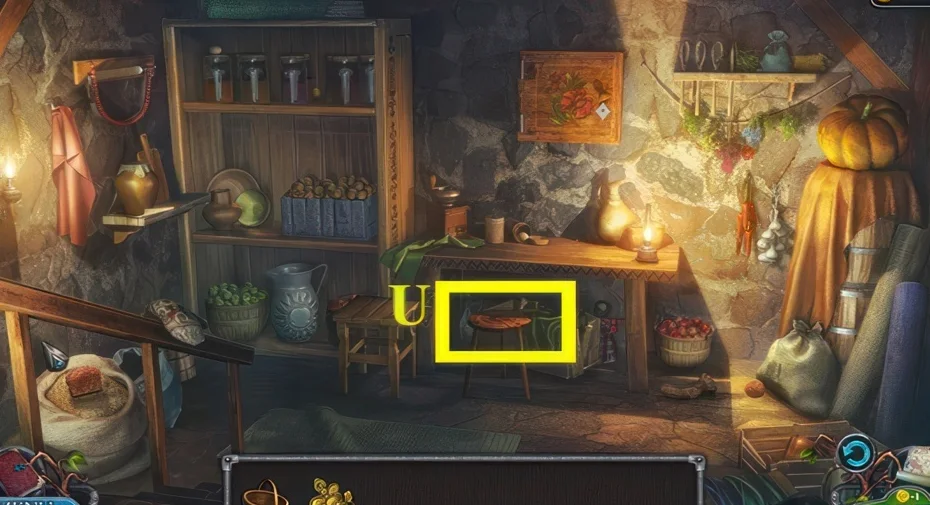
We could not confirm a solution for this one yet, so there is nothing to spoil here.
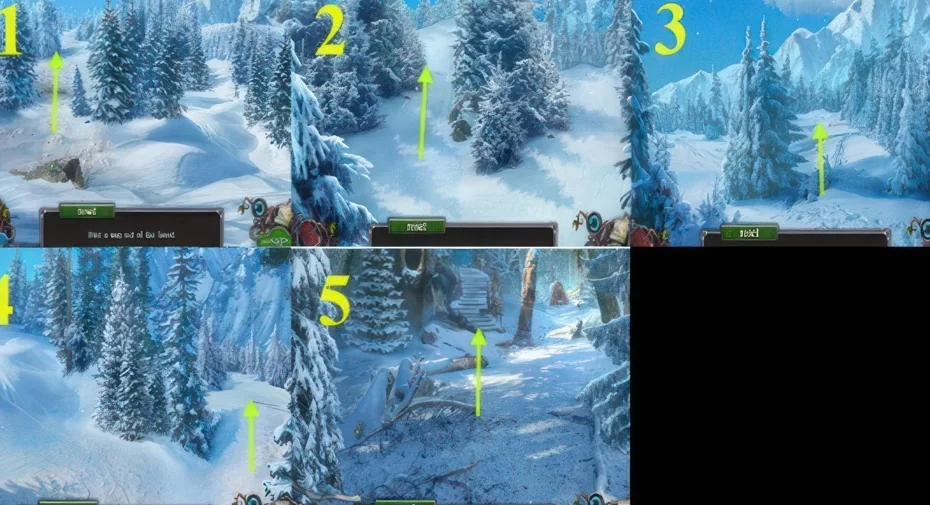
4Short sequence puzzle
Where: Chapter 2, directly after the basket scene
Follow the short button sequence at this board.
Show the full solution
1, 2, 3, 4, 5.
5Rune lock puzzle
Where: Chapter 2, marker E
You need: Runes 2/2
Compare the rune lock with its matching clue.
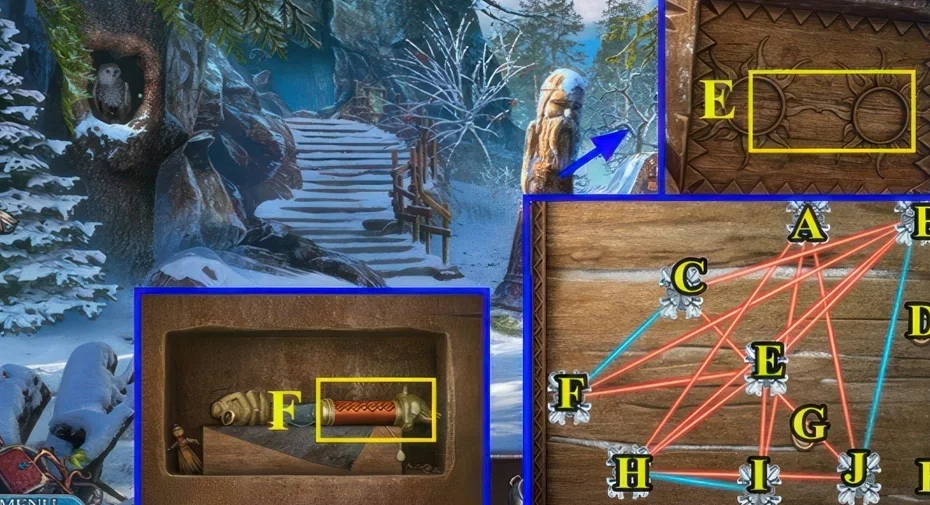
Show the full solution
A-K, C-A, F-C, E-F, B-E, J-B, H-G.
6Sign and figurine puzzle
Where: Chapter 2, marker area after the blade is fitted
You need: Knife
Complete the board to obtain the sign and the next figurine.
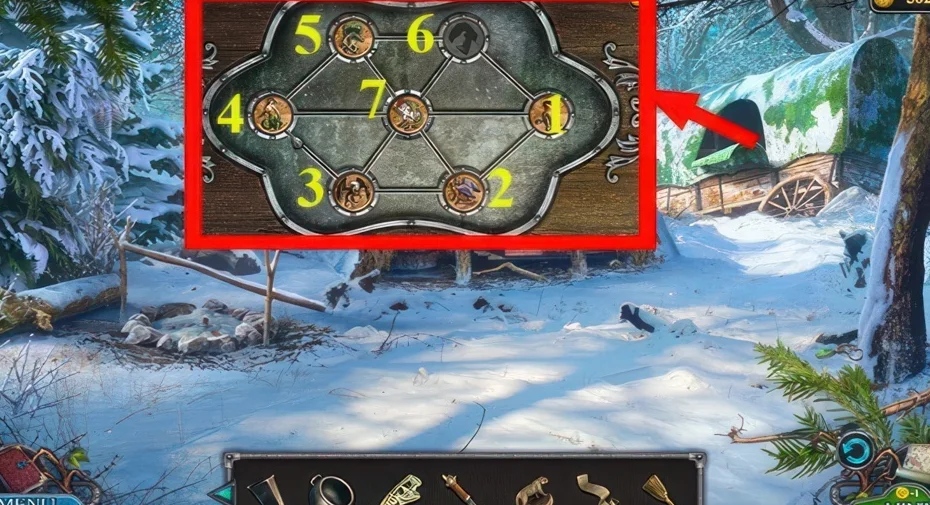
Show the full solution
2, 1, 6, 7, 3, 4, 5, 7, 2, 3, 7.
Scene 02
Clear the spider passage
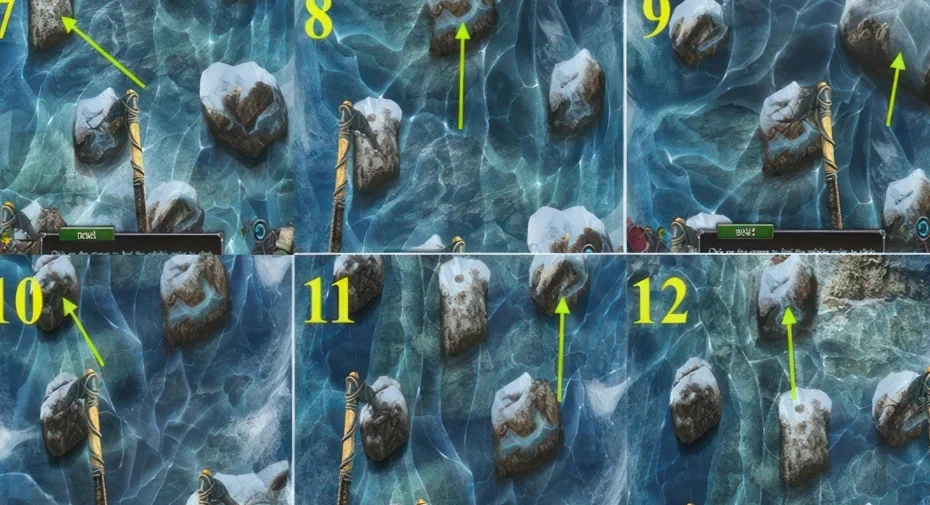
Complete the four spider stages in order, then the spider swap and hammer puzzle.
7Four part spider puzzle
Where: Chapter 2, the long puzzle chain that produces the spiders
Work through the four spider stages in sequence; the answer diagrams are grouped below.
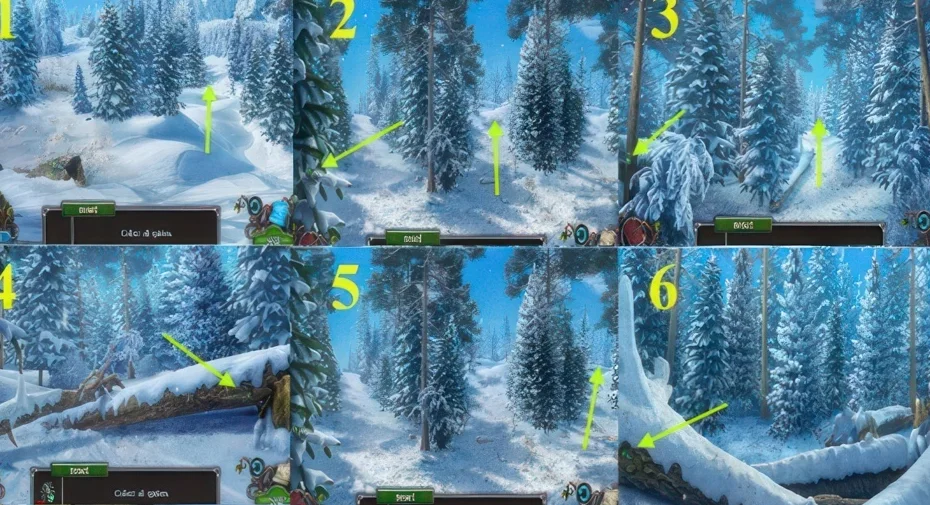
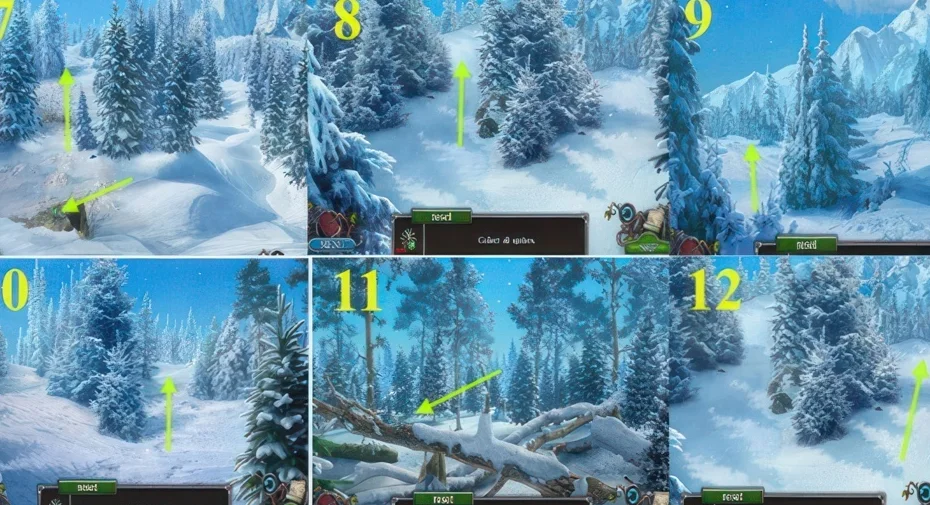
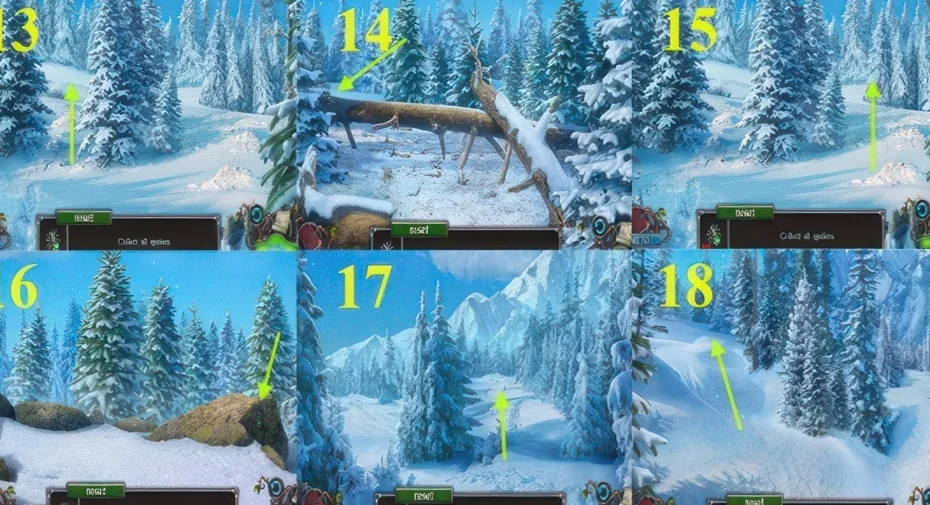
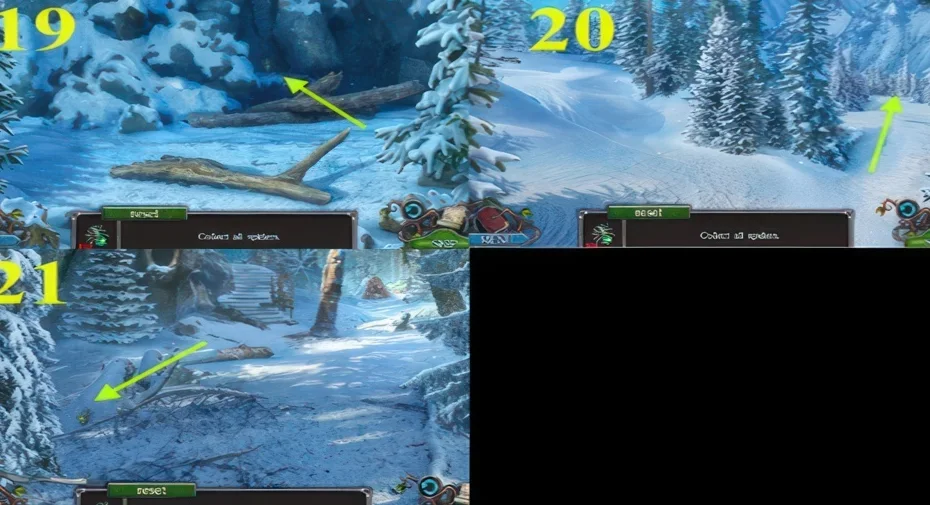
8Spider swap puzzle
Where: Chapter 2, marker O
You need: Spiders
Swap the spiders into the arrangement required by the board.
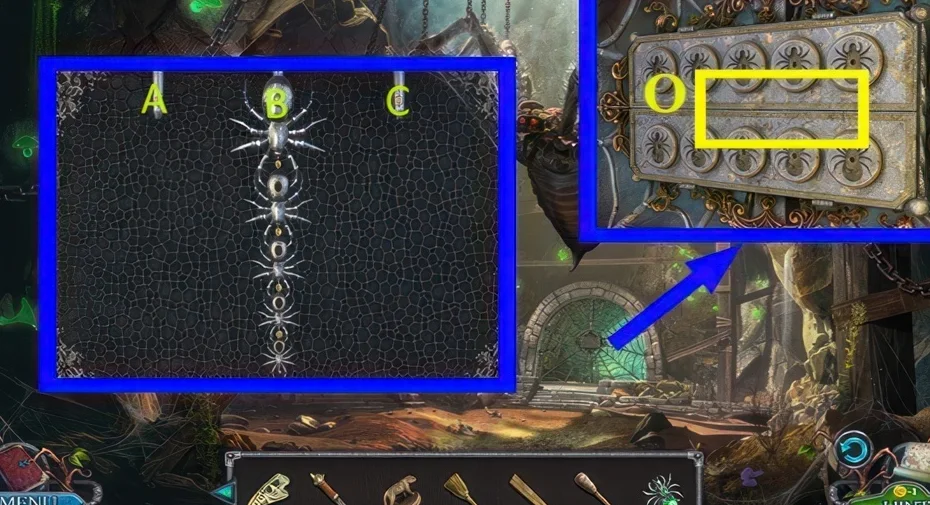
Show the full solution
B-A, B-C, A-C, B-A, C-B, C-A, B-A, B-C, A-C, A-B, C-B, A-C, B-A, B-C, A-C, B-A, C-B, C-A, B-A, C-B, A-C, A-B, C-B, C-A, B-A, B-C, A-C, B-A, C-B, C-A, B-A.
9Puzzle that yields the hammer
Where: Chapter 2, marker P
Complete this mechanism and collect the hammer.
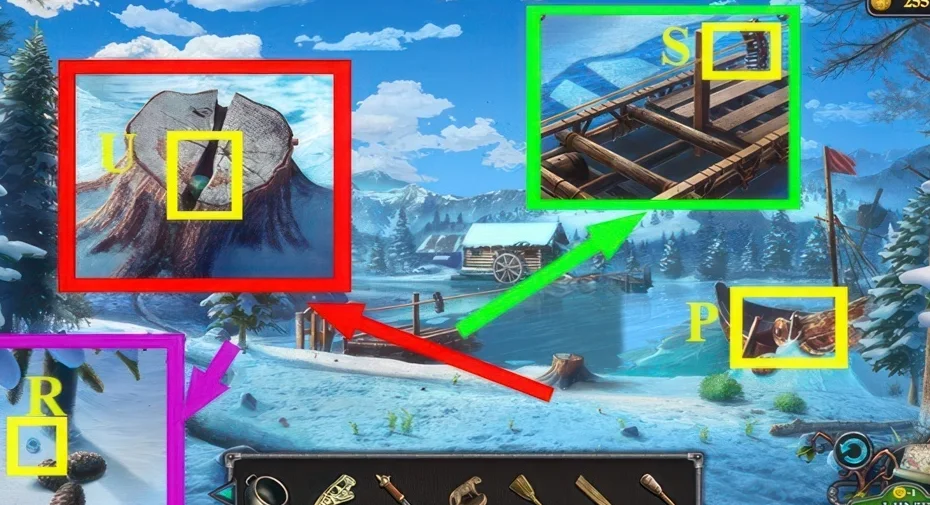
We could not confirm a solution for this one yet, so there is nothing to spoil here.
Scene 03
Follow the figurines and animal clues
Use the figurines and burning torch before the wolf dial and animal placement. Continue through the signs and bags.
10Figurine row puzzle
Where: Chapter 2, marker H, using the three figurines
You need: Figurines 3/3
Arrange the figurines in the required row.
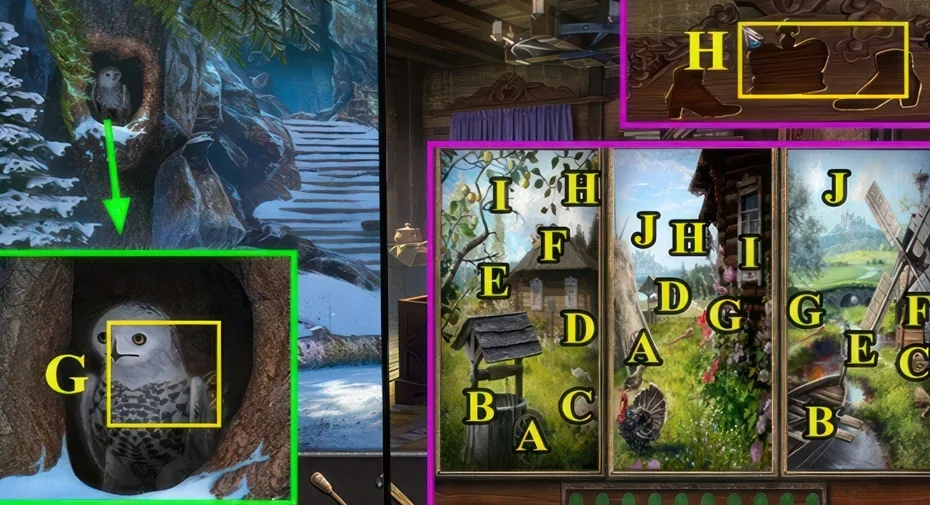
Show the full solution
A, B, C, D, E, F, G, H, I, J.
11Burning torch puzzle
Where: Chapter 2, marker N, after lighting the torch
You need: Burning torch
Use the burning torch at the marked interaction.
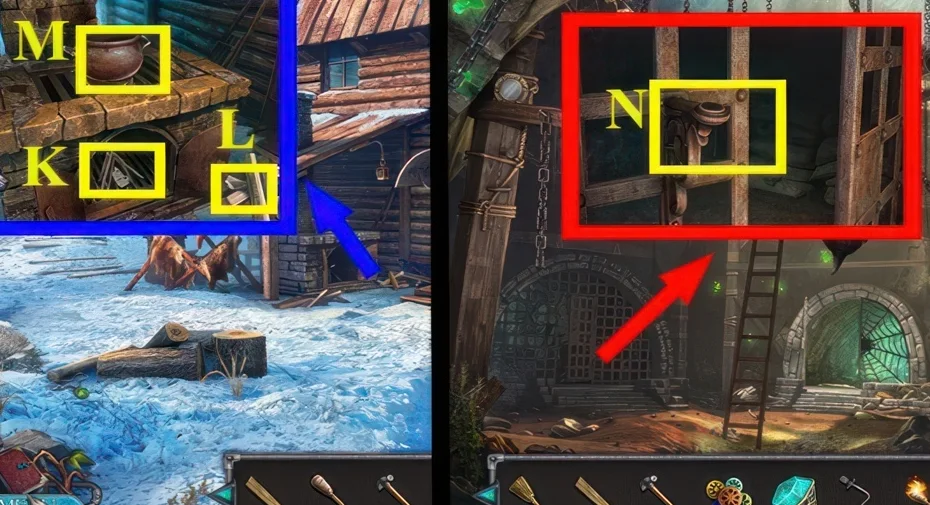
We could not confirm a solution for this one yet, so there is nothing to spoil here.
12Numbered dial puzzle that yields the wolf
Where: Chapter 2, the puzzle chain ending with the wolf figurine
Set the numbered dial to obtain the wolf figurine.
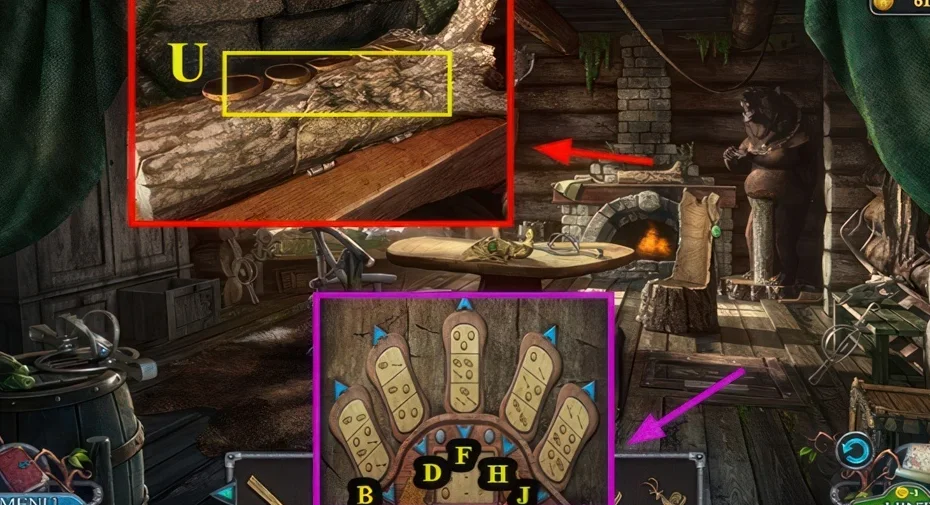
Show the full solution
B, F, F, F, H, J, J.
13Animal figurine placement
Where: Chapter 2, marker U, on the board of carved animals
You need: Wolf · Lynx · Bear · Deer · Eagle
Place the animal figurines at the matching board.
We could not confirm a solution for this one yet, so there is nothing to spoil here.
Variants: Players report the animal starting positions vary between playthroughs.
14Signs rail puzzle
Where: Chapter 2, marker W
You need: Signs
Move the signs along the rails to their matching positions.
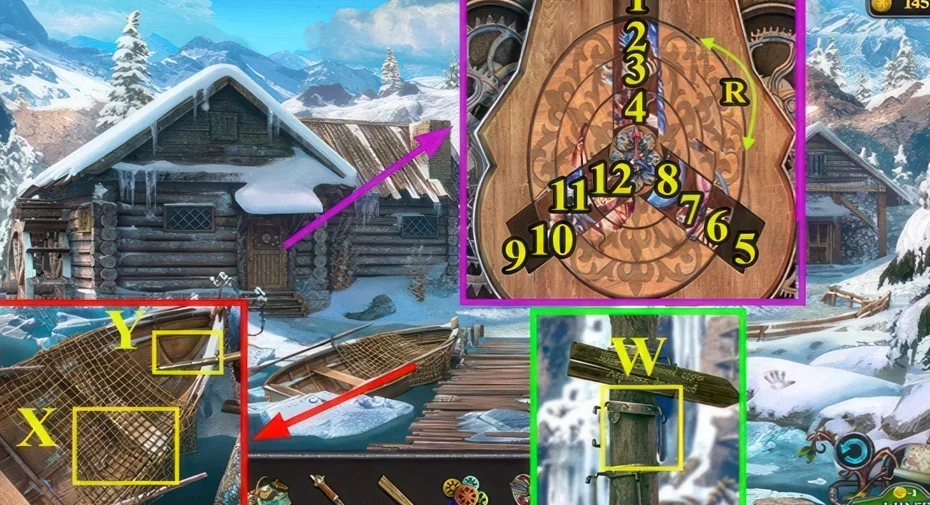
Show the full solution
11-10, 3-2, 7R-3, 8-7, 12-11, 4R-8, 1-2, 7-6, 6R-2, 8-7, 9-10, 11R-7, 5-6, 6R-10.
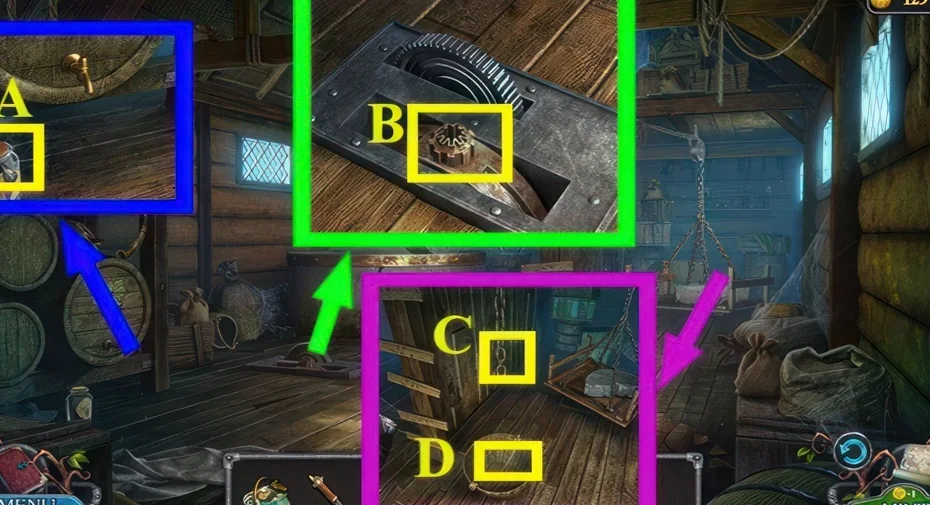
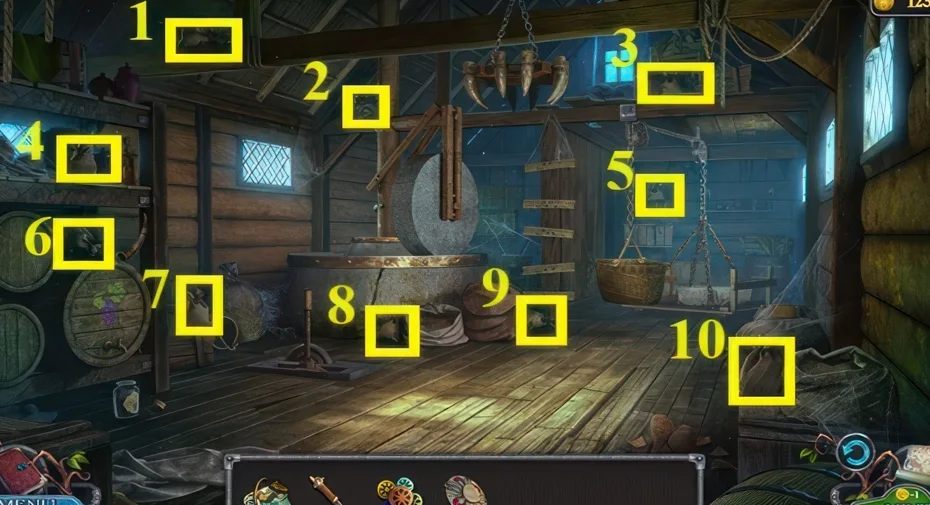
15Bag collecting scene
Where: Chapter 2, after the lever and chain are used
You need: Lever · Chain
Search the scene for the bags before moving on.
Scene 04
Open the frozen route and prepare the ingredients
Use the handcuff key and ice pick, then the stained glass and mitten chips. Finish with the ingredient order.
16Handcuff key puzzle
Where: Chapter 2, marker F, after taking the key at marker E
You need: Key
Recover and use the key for the handcuffs.
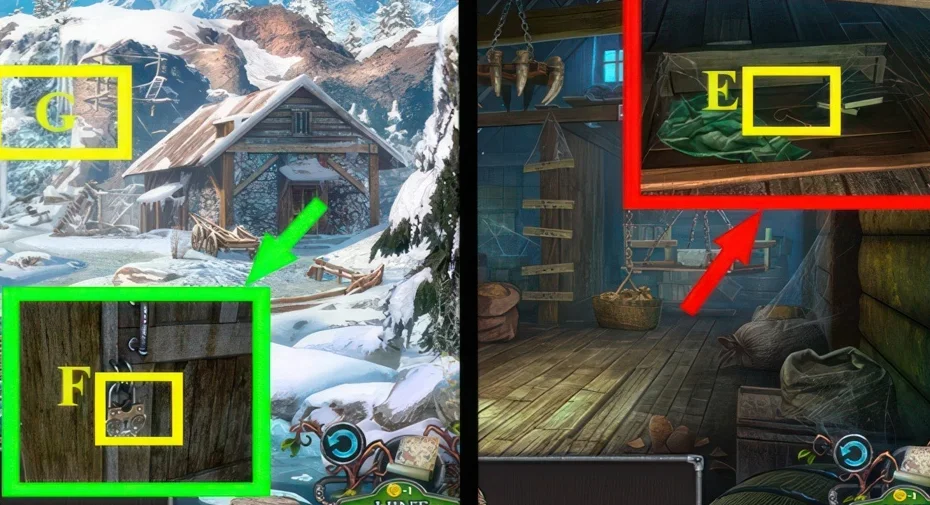
We could not confirm a solution for this one yet, so there is nothing to spoil here.
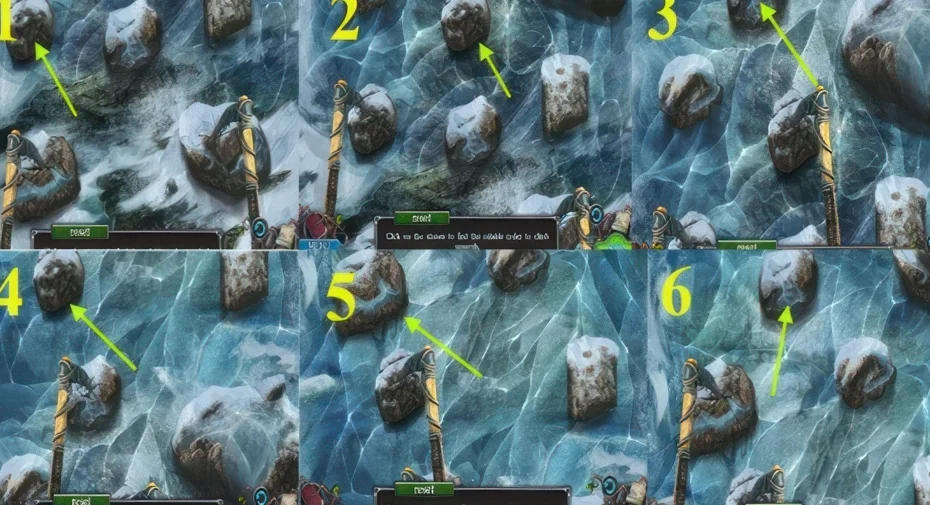
17Ice pick puzzle
Where: Chapter 2, marker G, after obtaining the ice picks
You need: Ice picks
Complete the ice-pick mechanism before continuing through the frozen route.
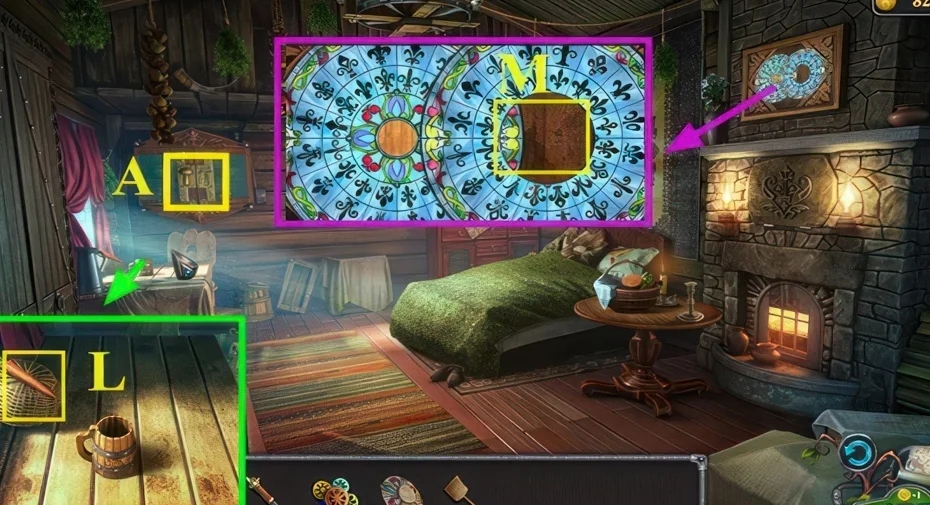
18Stained glass rosette puzzle
Where: Chapter 2, marker M, rounded windows
You need: Stained glass piece
Arrange the stained-glass pieces around the rosette.
Show the full solution
1, 2, 3, 4, 5, 6; then 7, 8, 9, 10.
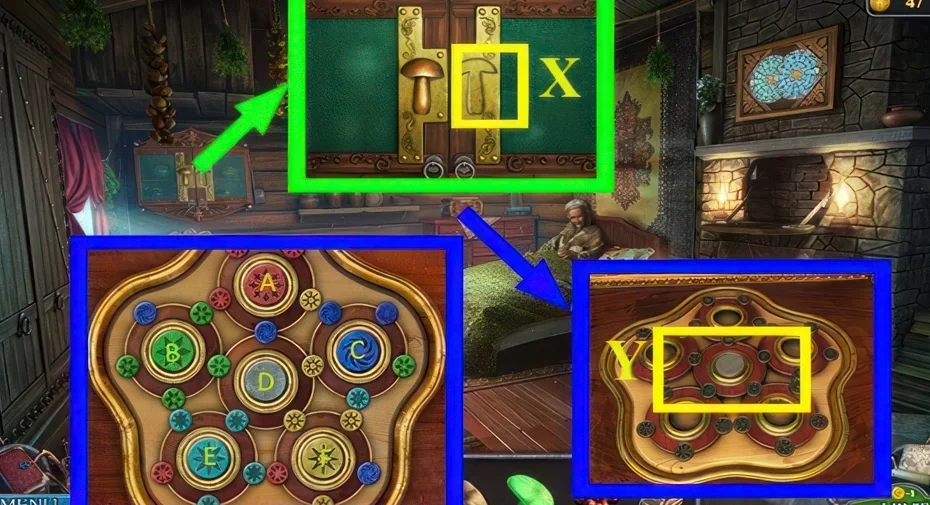
19Mitten chip puzzle
Where: Chapter 2, marker Y, using the fifth chip
You need: Chips 5/5
Use the mitten chips at their matching mechanism.
Show the full solution
Right x2, left x3, up x3, down x3, right x4, down, left x4, down x4, up, left x6, right, left, right x2, then the follow-up chains down x2, right, down x5, right x4, down, right x4.
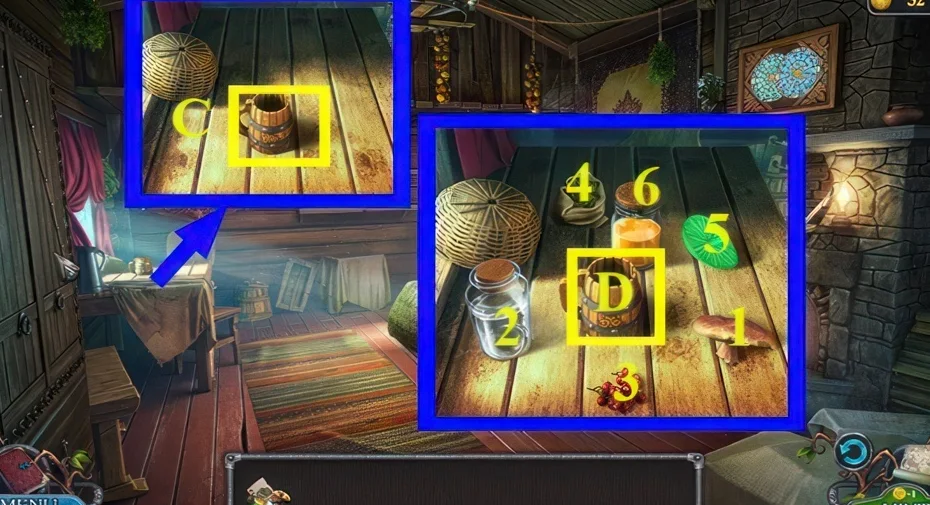
20Ingredient order puzzle
Where: Chapter 2, marker D, in the potion scene
You need: Tincture · Pinecone powder · Spider mushroom · Glowing mushroom · Rowan
Use the ingredient clue to set the preparation order.
Show the full solution
Use items 1, 2, 3, 4, 5, 6 in order to get the mug with potion.
This guide covers the researched puzzle stops. Some connecting exploration and item pickups are still being documented.
Collectibles along the way
- Chips · 5 in this chapter (as stated by sources) — The walkthrough tracks two chip sets in this chapter, Chips 1/4-4/4 and Chips 1/5-5/5.
- Figurines · 3 in this chapter (as stated by sources) — Numbered figurines gathered across the chapter and used at marker H.
- Boards · 4 in this chapter (as stated by sources) — Numbered Boards 1/4 to 4/4, used on the ladder and gate.
- Elements · 5 in this chapter (as stated by sources) — The walkthrough shows only Elements 2/5 being picked up, so the other four placements are not documented there.
- Runes · 2 in this chapter (as stated by sources) — Runes 1/2 and 2/2, used at marker E.
Open the Legendary Tales 3 collectibles checklist to tick items off as you play.
Commonly missed
- A rope-and-pins puzzle with 15 pins: an AppGamer player reports finding no hint for it in online solutions.
- The animal puzzle, where published solutions do not match the player's starting positions (AppGamer).