Legendary Tales 3 Chapter 1 Walkthrough – Egil and the Disease
Legendary Tales: Stories · last updated 2026-10-15
Chapter overview and locations
Egil, an experienced herbalist, is the only one who can stop an incurable disease spreading through his settlement, and the elder is already sick. He searches the village, ruins and a lakeside shrine, gathering herbs, tools and rune stones to brew a remedy. The chapter closes with a puzzle built from the seven Seeds of the Tree of Life.
Scenes in this chapter: Herbalist's log house interior (opening scene) · Ruined stone courtyard with a circular stone lock and rubble · Rocky ravine with torch-lit stalls and a mine cart · Village yard with a spinning wheel and a stone-and-timber house · Shrine with carved guardian statues and bronze figurines on pedestals · Lake shore with standing rune stones, a wooden idol and a rowboat
Step-by-step walkthrough
Follow the scenes below. Required items and screenshots sit beside each stop; answers expand on request. Select a screenshot to enlarge it.
Jump to a scene · 4 sections
Scene 01
Prepare the herbs and search the first rooms
Start with the herb recipe and arrow board. Search the cabinet and nearby key locks as you gather the next tools.
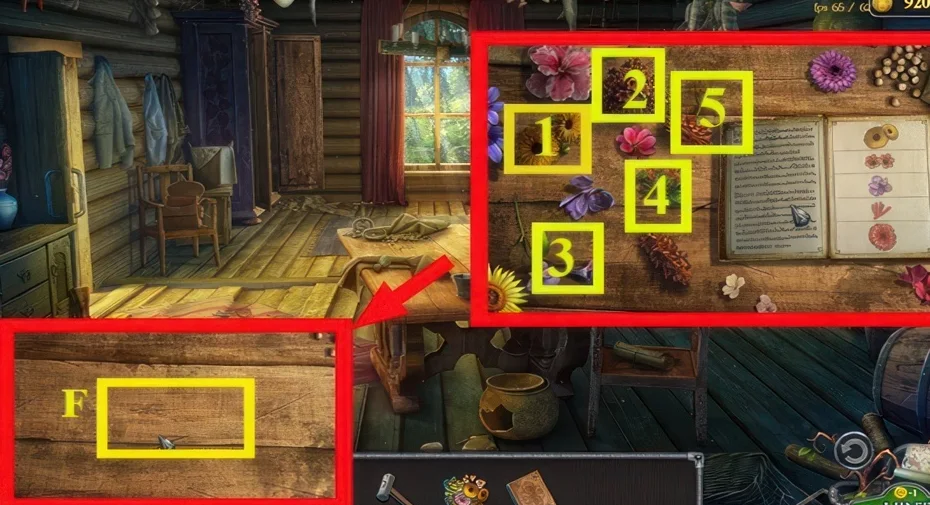
1Herb and recipe puzzle
Where: Chapter 1, herbalist's hut, marker F
You need: Herbs · Recipe book
Compare the herbs with the recipe before starting the first mechanism.
Show the full solution
Press 1, 2, 3, 4, 5 in order.
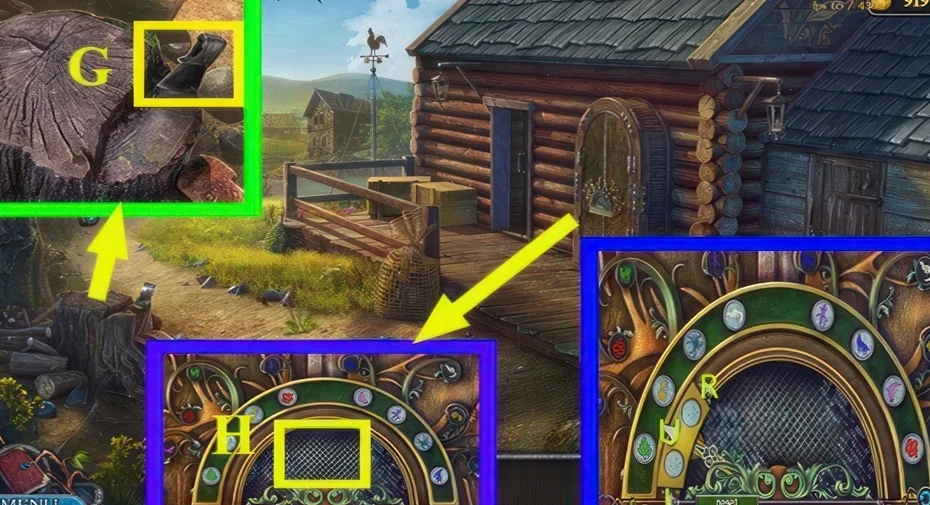
2Arrow maze puzzle
Where: Chapter 1, marker H, the area reached by going left from the hut
You need: Arrow
Move through the arrow maze using the directions in the board diagram.
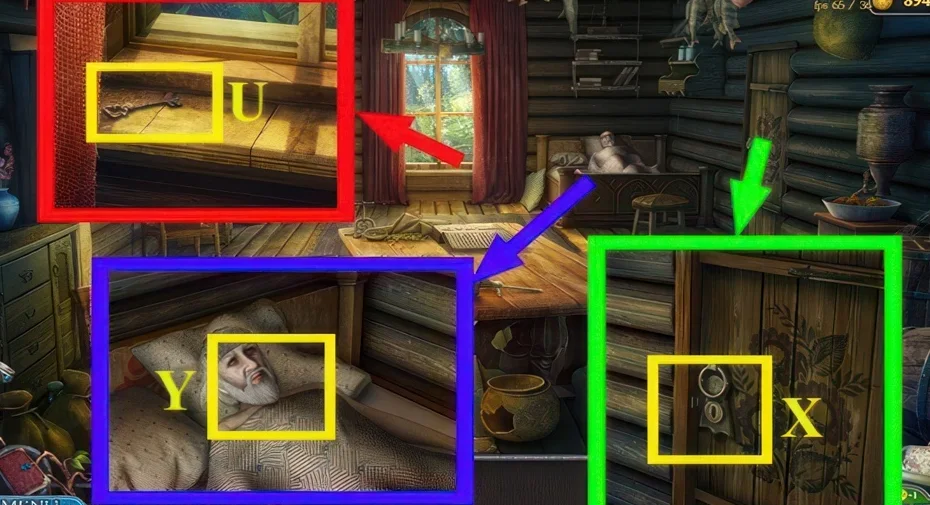
3Locked cabinet puzzle
Where: Chapter 1, marker X; opened with the key, gives the Settlement Medallion
You need: Key
Inspect the locked cabinet and use its matching key.
We could not confirm a solution for this one yet, so there is nothing to spoil here.
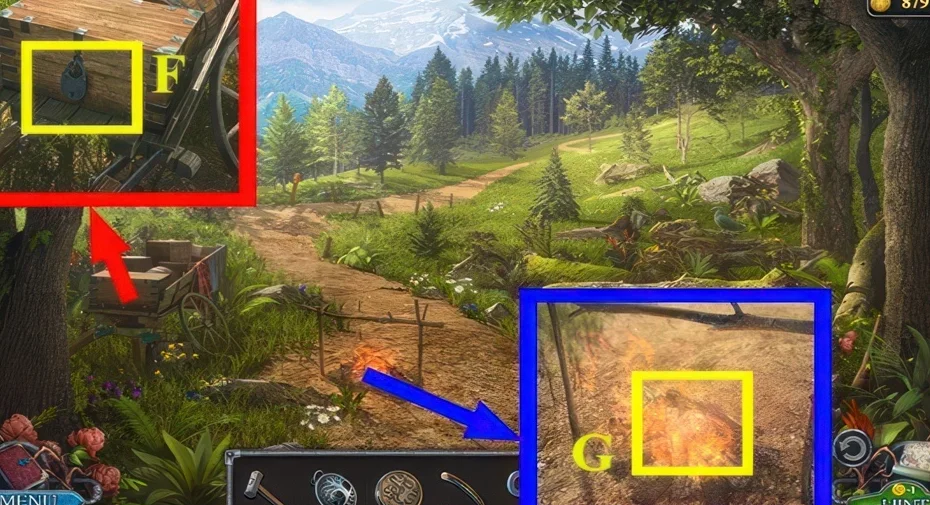
4Key locks
Where: Chapter 1: cabinet at marker X, torch alcove at marker F, boards chest at marker J, upper room at marker N
You need: Keys found in the same scenes
Use the recovered keys on their matching locks as you search the early rooms.
Show the full solution
Use each key on its matching lock.
Scene 02
Follow the runes and drum clue
Work through the rune mechanisms, search the hidden-object scene, and use the drum letters before the token lock.
5Rune symbol puzzle
Where: Chapter 1, scene after the medallion door; reward is Rune 3/4
Read the rune symbols at the mechanism before entering the pattern.
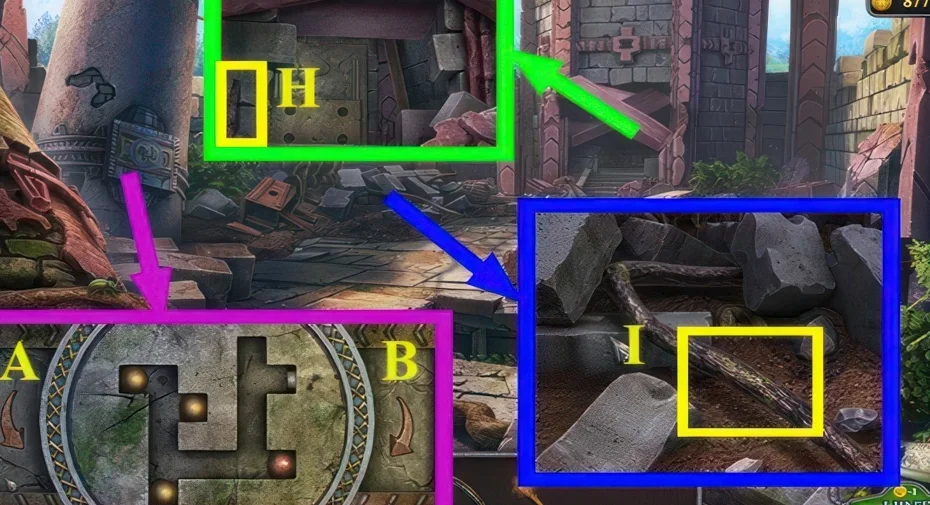
Show the full solution
A, A, A, A, B, A, B, A, A, B, B, A, B, B, A, B, A.
6Rune stone rotation puzzle
Where: Chapter 1, marker S, on the shrine wall
You need: Runes 4/4
Rotate the runestones to match the clue for this board.
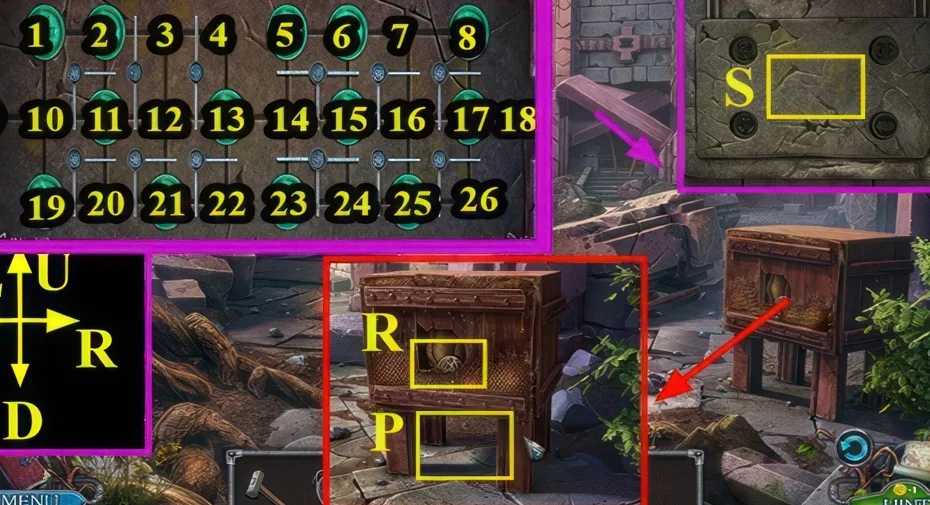
Show the full solution
1-10, 2-1, 11-2, 10-11, 19-10, 11-20, 10-11, 20-19, 11-20, 9-10, 10-11, then 1-10, 2-1, 13-12, 12-3, 3-2, 11-12, 2-11, 12-13, 17-18, 6-7, 5-6, 15-14, 6-15, 14-5, 7-6, then 15-16, 13-14, 14-15, 23-14, 15-24, 16-15, 25-16, 24-25, 15-24, 16-15, 8-7, 18-17, then 17-8, 25-16, 16-17, 17-18.
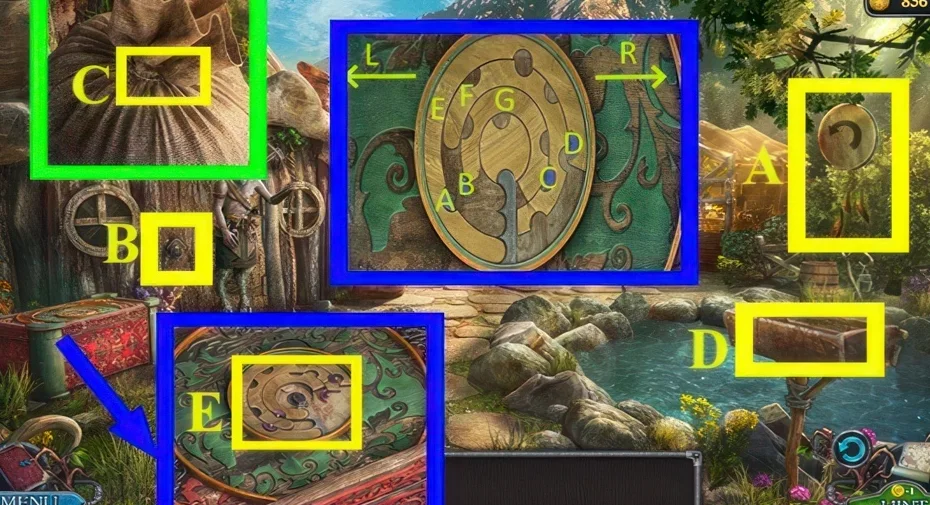
8Drum letter puzzle
Where: Chapter 1, marker E, after spreading the grain
You need: Detail
Use the letter clue on the drum mechanism.
Show the full solution
GL, B, C, FL, A, D, ER, D, A, FR, C, B, GR, CLICK.
9Token lock puzzle
Where: Chapter 1, marker P, after using Gralang
You need: Tokens 4/4
Fit the tokens into the lock and complete its pattern.
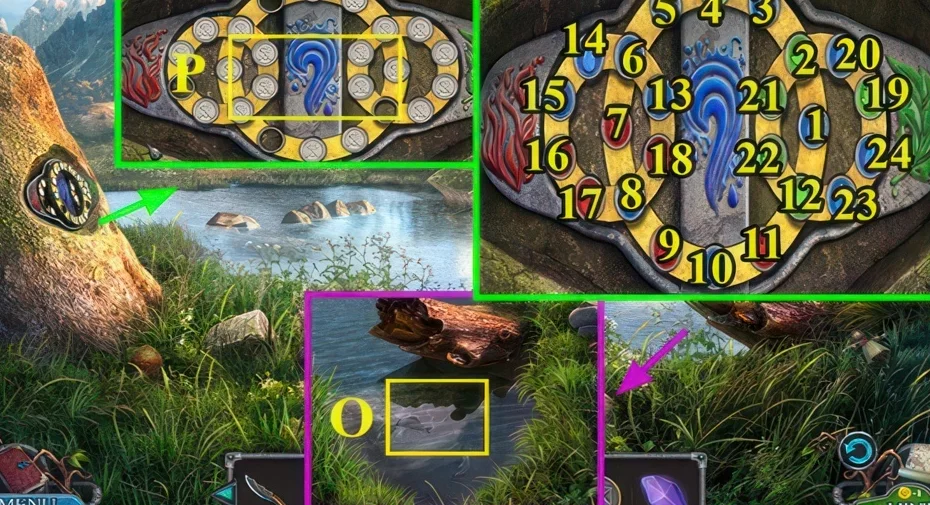
Show the full solution
24-4, 2-24, 21-19, 22-20, 11-13, 10-15, 9-14.
Scene 03
Assemble the figurines and recipe
Continue through the statuette and figurine mechanisms, then the mirror, silver detail and recipe.
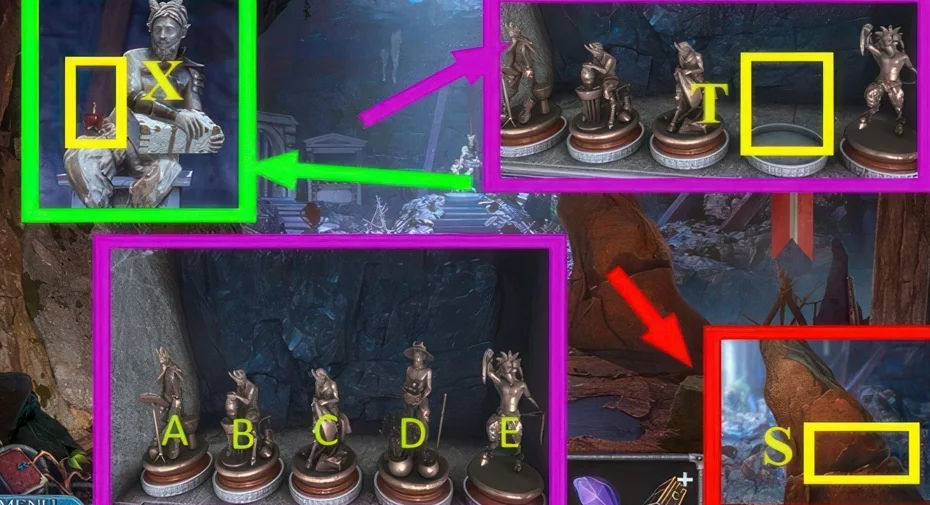
10Statuette altar puzzle
Where: Chapter 1, marker T
You need: Statuette
Use the statuette at the altar to start the next mechanism.
Show the full solution
E, C, B, A, D.
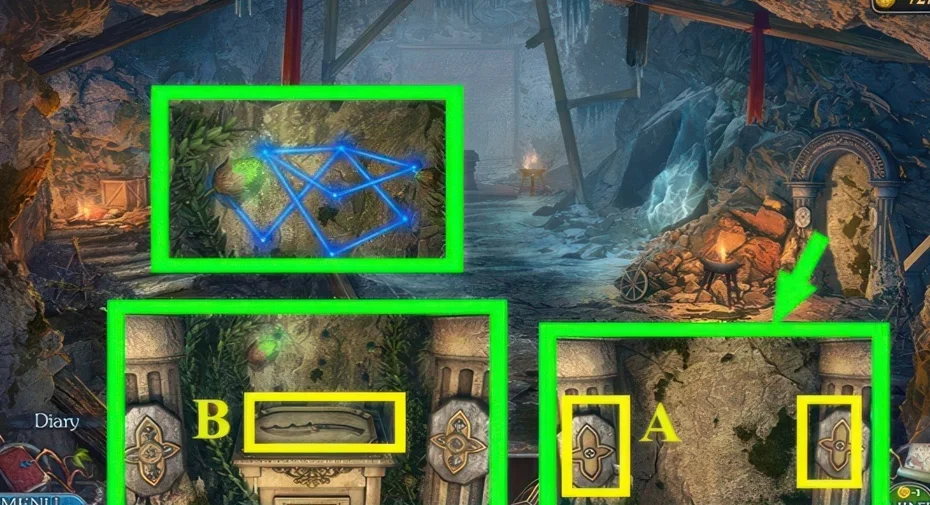
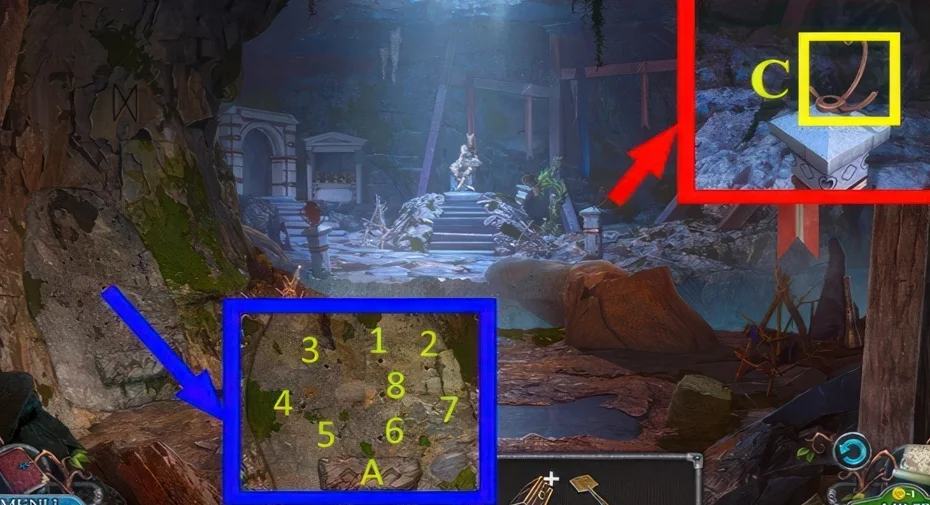
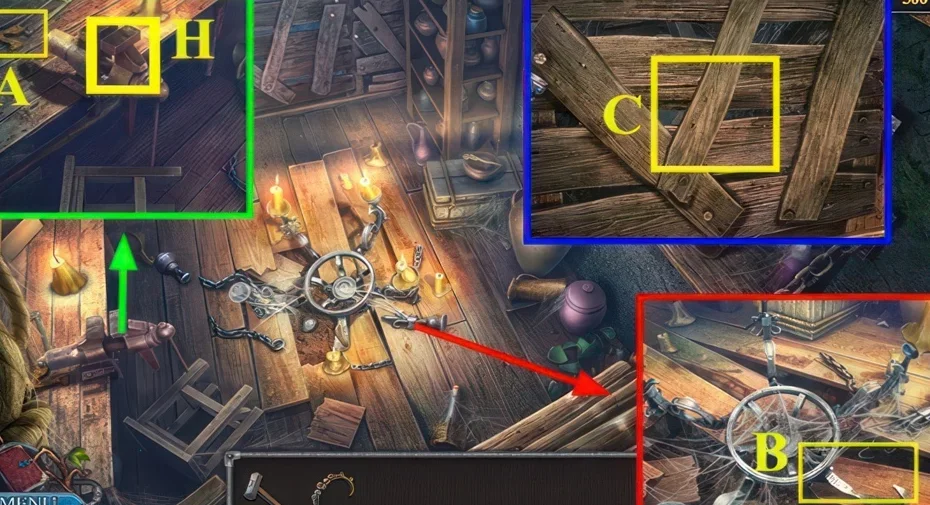
11Figurine parts puzzle
Where: Chapter 1, marker A; the hint comes from using the knife at marker B
You need: Figurine parts 2/2
Assemble the figurine parts, then follow the board sequence.
12Mirror puzzle
Where: Chapter 1, scene reached by going left after the figurine puzzle; rewards the Mirror
Adjust the mirror mechanism after completing the figurine board.
We could not confirm a solution for this one yet, so there is nothing to spoil here.
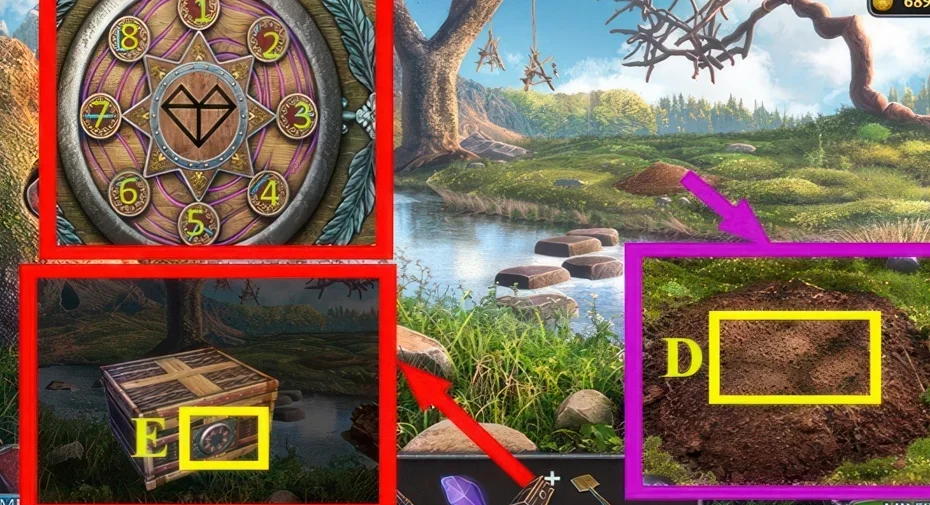
13Silver detail puzzle
Where: Chapter 1, marker E, after digging up the second detail
You need: Detail
Use the silver detail at its matching mechanism.
Show the full solution
3, 1, 6, 4, 2, 5.
14Recipe puzzle
Where: Chapter 1, marker K, using the recipe taken from marker J
You need: Recipe
Read the recipe and arrange its ingredients at the preparation station.
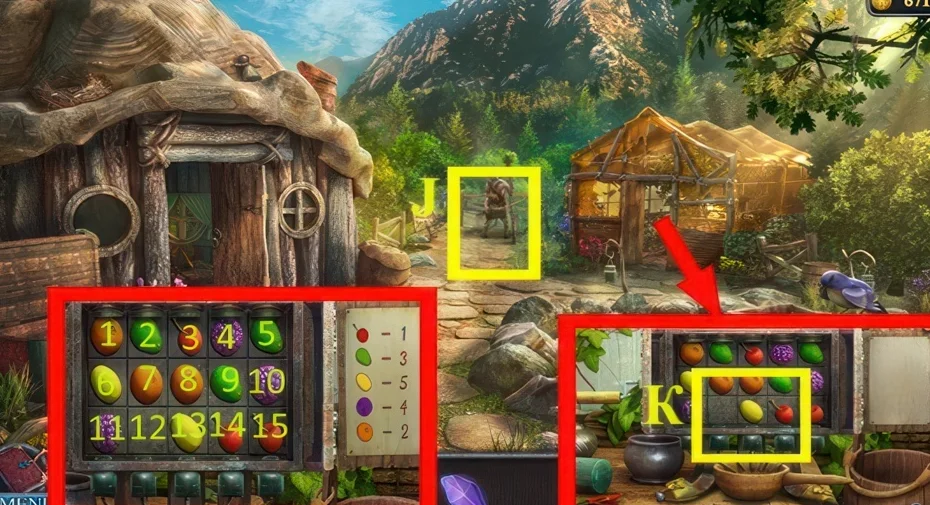
Show the full solution
7, 2, 3, 8, 7, 6, 1, 2, 7, 12, 13, 14, 15, 10, 9, 8, 7, 6, 11, 12, 13, 14, 9, 8, 7, then 6, 11, 12, 13, 8, 7, 6, 11, 12, 13, 8, 3, 2, 7, 8, 9, 4, 3, 2, 7, 8, 13, 14, 15, 10, 5, 4, 3, 8, 9, then 10, 5, 4, 3, 8, 9, 14, 15, 10, 5, 4, 3, 8, 13, 14, 9, 4, 5.
Scene 04
Operate the machines and complete the cure route
Use the chips, herb list and stone disc before the match and multi-stage mechanism. Finish with the book and seed.
15Four chip machine puzzle
Where: Chapter 1, marker O; needs all four chip pieces
You need: Chip with a dot · Chip with a line · Chip with a square · Chip with a triangle
Install all four chips before operating the machine.
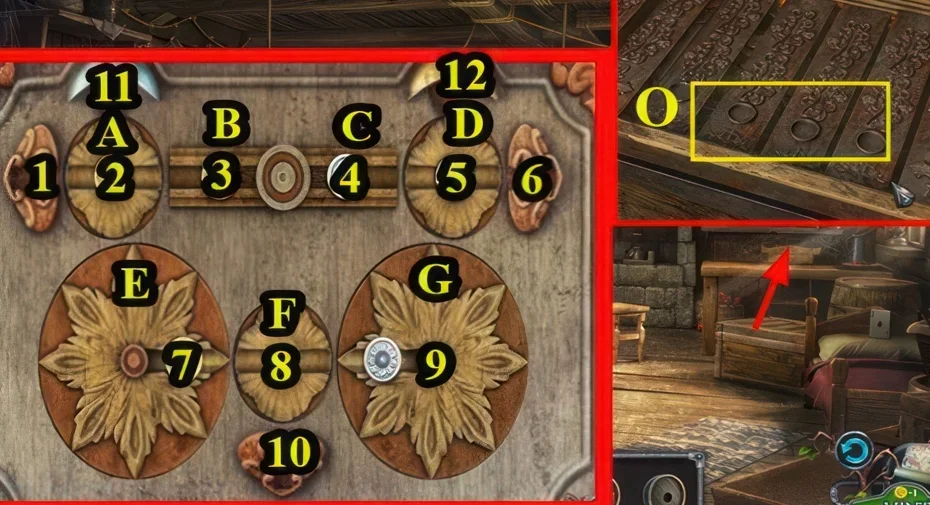
Show the full solution
5-6, 4-5, 2-1, 3-2, C, G, 9-4, 7-8, F, 8-10, F, 4-9, G, 9-8, 8-7, F, 10-8, F, 8-9, G, followed by the further long chains printed in the walkthrough (second to fifth lines) and ending 1-2, 2-3, B, 3-7, E, 7-8, 8-9, G, 9-4, C, 4-5, D, 5-12.
16Herb list puzzle
Where: Chapter 1, after using the fire iron and taking the list of herbs
You need: List of herbs
Compare the herbs with the list at this stop.
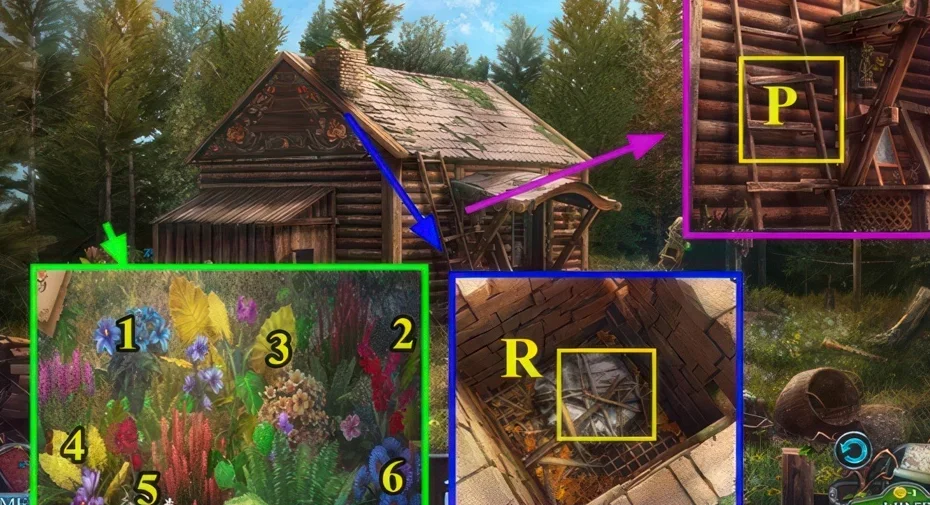
Show the full solution
1, 2, 3, 4, 5, 6.
17Stone disc puzzle
Where: Chapter 1, marker U, after using the stone disc
You need: Stone disc
Fit the stone disc to its matching board.
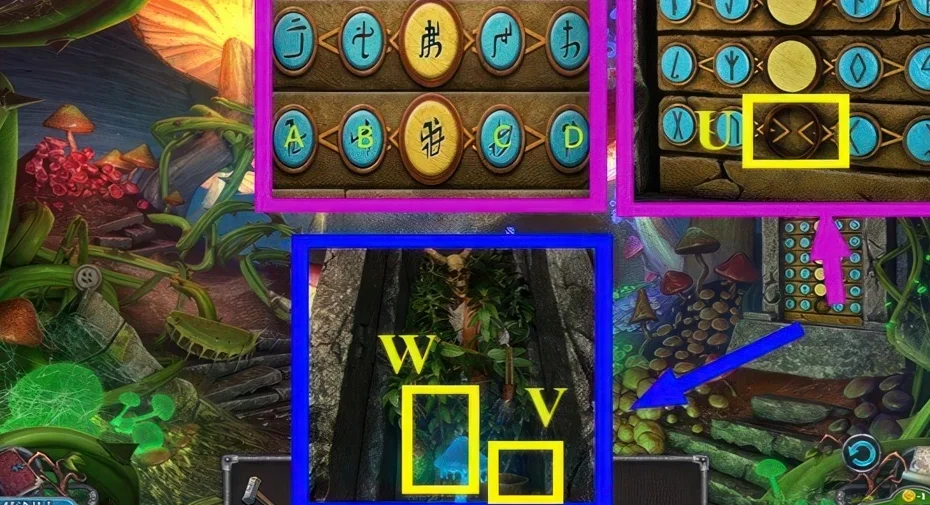
Show the full solution
A, B, C, D, B, C, A, D, A, C, C, D, A, B, A, C, A, C, B, D, A, D, B, C.
18Match puzzle
Where: Chapter 1, marker Y, after applying the ghost mushroom slime
You need: Ghost mushroom slime
Inspect the match board and follow its own arrangement clue.
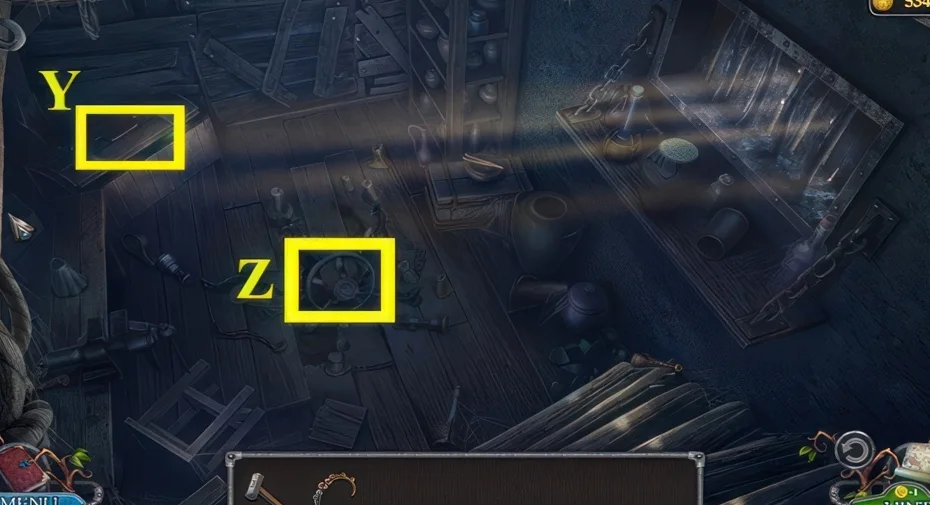
We could not confirm a solution for this one yet, so there is nothing to spoil here.
19Four stage mechanism puzzle
Where: Chapter 1, marker C area, after prying the mechanism open with the crowbar
You need: Crowbar
Complete the mechanism one stage at a time; use the diagram to identify the controls.
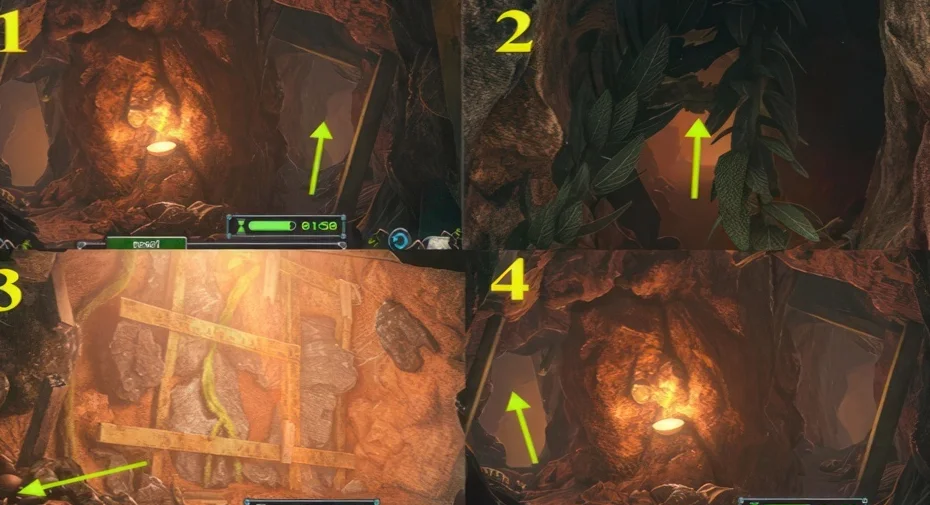
20Book puzzle
Where: Chapter 1, marker I
You need: Book
Open the book mechanism and compare its clue with the board.
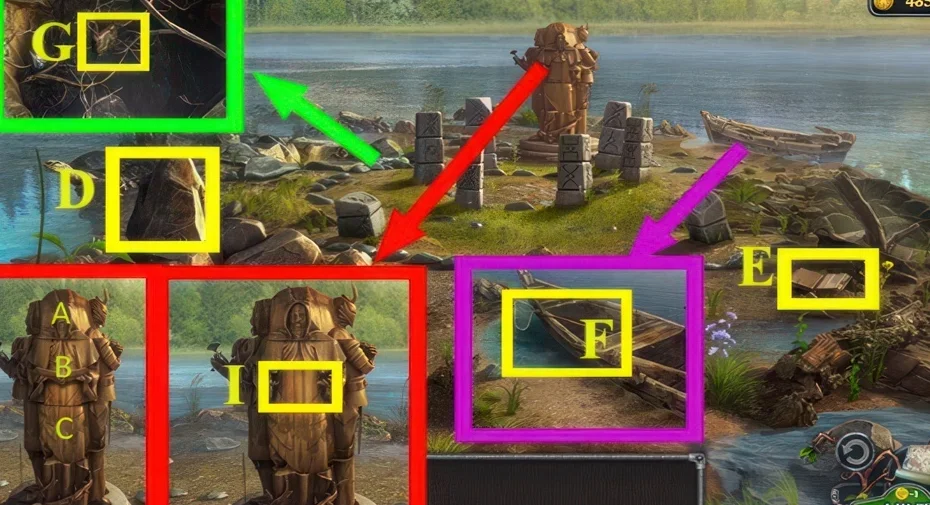
Show the full solution
A, A, B, B, B, C, C.
21Seed of the Tree of Life puzzle
Where: Chapter 1, marker U, at the lakeside shrine; the chapter finale
You need: Seed of the Tree of Life 7/7
Bring the seed of the Tree of Life to the final seed mechanism.
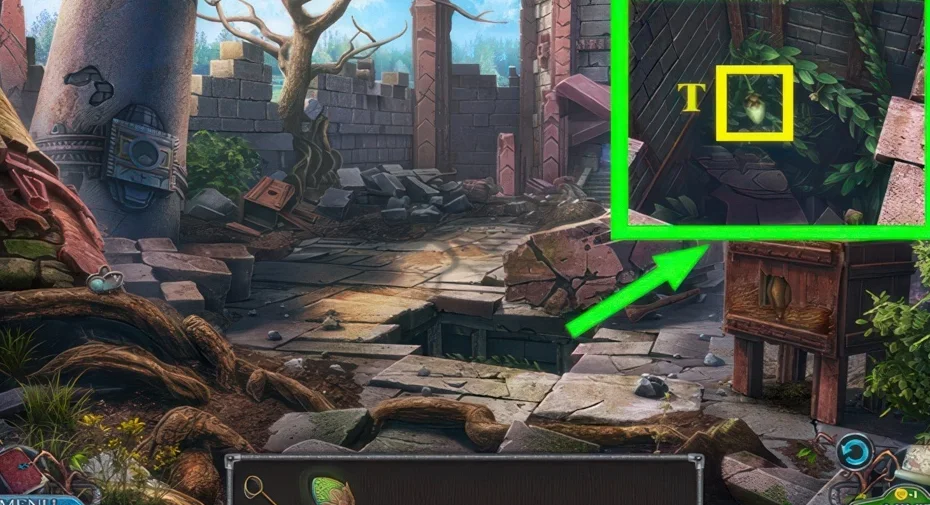
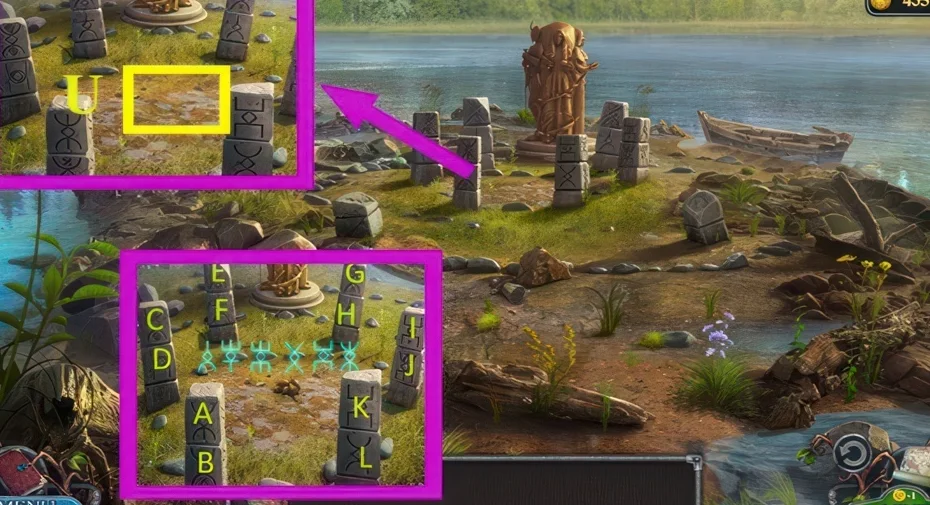
This guide covers the researched puzzle stops. Some connecting exploration and item pickups are still being documented.
Collectibles along the way
- Seed of the Tree of Life · 7 in this chapter (as stated by sources) — Numbered 1/7 to 7/7 in the walkthrough and spent in the chapter's final shrine puzzle.
- Runes · 4 in this chapter (as stated by sources) — Numbered rune pieces gathered in three scenes and used on the shrine wall.
- Tokens · 4 in this chapter (as stated by sources) — Collected with spear, hammer, tambourine and Gralang, then spent at marker P.
- Sticks and figurine parts — Walkthrough tracks Sticks 1/2, 2/2 and Figurine part 1/2, 2/2 as quest pieces.
Open the Legendary Tales 3 collectibles checklist to tick items off as you play.
Commonly missed
- A fish hidden in the scene that yields the knife, reported by AppGamer players.
- The hammer-and-nails repair step, reported by an AppGamer player as not working.